

Connecting the MeteoHelix to Wifi with The Things Indoor LoRaWAN Gateway
/
A solid GREEN light (not-blinking) on The Things Indoor Gateway indicates that it is listening for Packets with an established wifi Connection together with a connection to the LoRaWAN LNS backend network server.
QUESTION: How can I connect the MeteoHelix weather station to my Wifi?
ANSWER: MeteoHelix IoT weather stations using LoRaWAN can easily connect to any existing wireless Wifi networks and routers in two ways:
Wireless connection using the optional The Things Indoor LoRaWAN gateway is described bellow.
Wired connection with an Ethernet cable via the Browan Femto LoRaWAN Gateway (TTIF) or the Wifx Lorix One outdoor LoRaWAN gateway is described in this article:
Wireless Wifi connection using The Things Indoor Gateway
Record the gateway
EUI
and Wifi password for setup
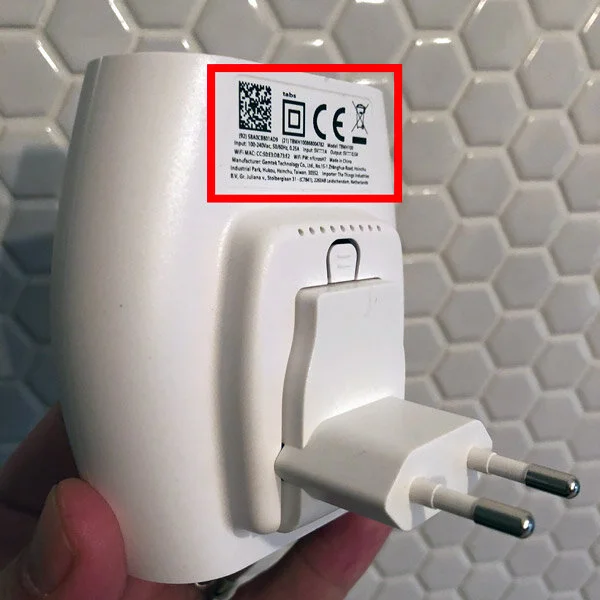
1. Gateway EUI is obtained by writing down the fist 6 digits of the 12 digit alphanumeric number located in the top left corner of the sticker below the QR code. This 12 digit number is the gateway ID.
2. After the first 6 digits insert FFFE and then finish by writing down the last 6 digits.
Example: 58A0CB801AD9 —> 58A0CBFFFE801AD9
The gateway EUI is 58A0CBFFFE801AD9.
3. Write down the gateway Wifi password located after the phrase “WiFi PW:” on the same sticker. This alphanumeric Wifi password will look similar to “nYcnzoH7” and will be required in the next setup steps.
4. Prepare your home/office Wifi password also as you will required it later.

5. Press the Reset button
Press the reset button for 5 seconds (on the bottom of the gateway (red arrow) next to the USB port), until the light blinks GREEN-RED rapidly for a couple of times.
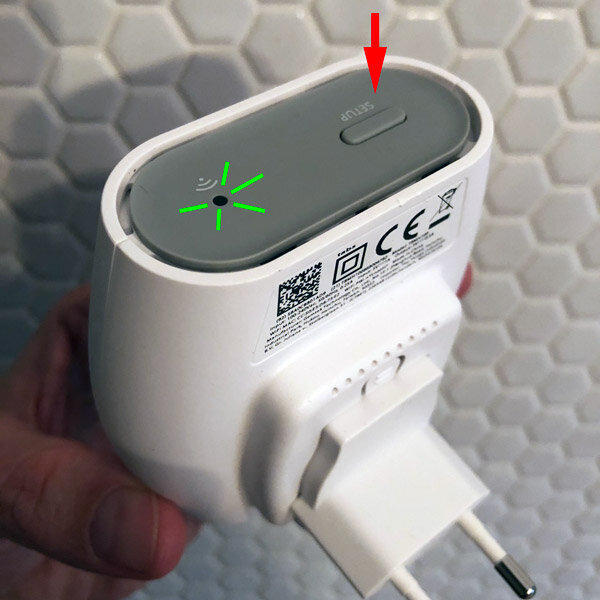
6. Press the Setup button
After resetting, press the SETUP button for 10 seconds (at the top of the gateway (red arrow)), until the light blinks RED rapidly.
Gateway’s Wifi network MiniHub-XXXXXX will now be visible.

7. Connect to the gateway’s Wifi
The gateway’s Wifi wireless network SSID is named MiniHub-XXXXXX, where the XXXXXX is the last 6 digits of the gateway ID as recorded in step 5 above.
Using your PC or phone, connect to the newly visible Wifi network using the Wifi password as recorded in step 3 above.
You will have about 10 minutes before the gateway’s Wifi disappears again.

8. In your Web browser access the gateway’s MiniHub Setup screen.
In your browser address bar type in 192.168.4.1 and press enter to access the WiFi config page.
9. Select your home/office Wifi network from the Scanned Networks list and enter in your WiFi network password.
10. Select the “Save and Reboot” option at the bottom of the screen.
If everything was entered correctly and working correctly and the gateway can connect to The Things Network (TTN) via your home/office Wifi, the light on top of the gateway will be solid green after about a minute.
NOTE: First the gateway will blink GREEN for a few seconds while it connects to your Wifi network. Then, it will blink GREEN-RED for a few seconds while it connects to the CUPS endpoint and fetches all of the necessary information to connect to the LNS traffic endpoint. If your configuration was successful, the LED will be solid GREEN which means that the gateway is connected to the LoRaWAN network and is ready to handle packets.
MeteoHelix IoT weather stations come with pre-configured gateways so that no additional configuration steps are necessary. Your weather station data will shortly start streaming to the allMETEO platform in 10 minute intervals.
REFERENCES: The above steps were adapted from the following TTN gateway setup instruction set: https://www.thethingsnetwork.org/docs/gateways/thethingsindoor/
BARANI DESIGN TECHNOLOGIES IS A MANUFACTURER OF PROFESSIONAL WIND SENSORS, RAIN GAUGES, WEATHER STATIONS AND METEOHELIX PERSONAL WEATHER STATIONS.