

Lorix One LoRaWAN Gateway Outdoor Installation Guide
/For mounting instructions on the Wifx L1, go here: Wifx L1 LoRaWAN Gateway Outdoor Installation Guide
QUESTION: How to install the Lorix One wireless LoRaWAN base station?
ANSWER: Ethernet to wireless LoRaWAN connection using the optional Lorix One Outdoor LoRaWAN Gateway is described bellow. The Lorix One can be purchased in our Web store as a set with lightning protection and a mounting bracket.
PDF instructions for printing download here: Ethernet Lorix One Wireless Base Station Installation Guide.pdf
Adding a Wifx Lorix One LoRaWAN Gateway to TTI (The Things Industries) Stack
Lorix One datasheet and user manual

Steps to perform indoors:
Attach the pipe mount (or wall mount) with two small screws.
Plug the 12 V power supply into a suitable indoor wall outlet (110/220 VAC).
Connect the power supply jack with the splitter cable (also known as POE injector cable). POE is short for Power-Over-Ethernet.
Plug the other end of the splitter cable (Ethernet male connector) into a live Ethernet port on a cable modem or router.
Into the common end of the splitter cable (Ethernet female connector where the cables join), plug in a suitably long Ethernet patch cable rated for outdoor use. Outdoor cable rating is very important, otherwise, an indoor Ethernet cable will start to crack and disintegrate in the sun in a few months due to UV light exposure. Please consider adding a surge arrestor to this point of the connection.
RECOMMENDATION: It is recommended that an additional Ethernet lightning surge arrester be installed between the outdoor cable and splitter connection to protect all indoor electronics, like internet routers and cable modems, since outdoor cables may act line antennas for lightning-induced electrical surges from far away lightning strikes. Lightning protection can be purchased in our Web store.
Unscrew the Lorix One end-cap (the gray cup) and remove the rubber grommet from its end. Put the grommet around the outdoor Ethernet cable, then slide the Ethernet connector end of the cable through the hole in the Lorix One end-cap. Finally, push the grommet, chamfered end first, into the hole of the end-cap so that it snaps into place, and the cable is properly sealed by the grommet in the end-cap.
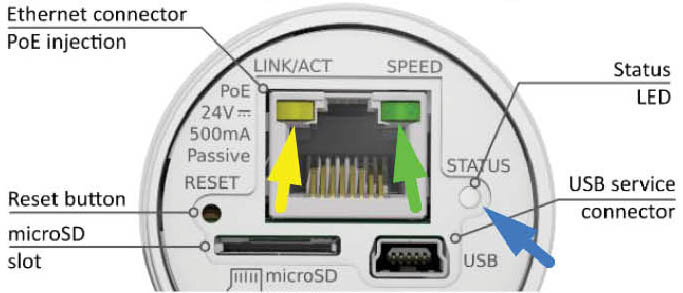
Connect the outdoor cable Ethernet connector into the Lorix One Ethernet port and note the blinking LED colors as shown by the arrows in the picture below or the video:
First, the yellow light blinks along with the blue status light.
After about 3 minutes, the green speed light will light up, at which point the gateway should become visible on your LoRaWAN server with an active status. See the accompanying Lorix One status lights video.
Lorix One LoRaWAN base station (gateway) status lights
Lorix One gateway status lights when active.
Outdoor mounting instructions:
8-9. Screw-on tightly the antenna surge arrester. Screw-on tightly the antenna. Final mounting:
A. Pull out the outdoor Ethernet cable from the Lorix One and rout it outside to the Lorix One’s final outdoor mounting place.
B. Once ready to mount outside, reconnect the Ethernet cable and screw on the end-cab snugly onto the Lorix One.
Mount outdoors as high up as possible with the antenna free from nearby obstructions on a pole or a wall using steel bands or screws as per your chosen mount.
Final check
Confirm that on your LoRaWAN server (Chirpstark, TTI, TTN, Loriot, etc.) the registered gateway shows an active status.
BARANI DESIGN TECHNOLOGIES IS A MANUFACTURER OF PROFESSIONAL WIND SENSORS, RAIN GAUGES, WEATHER STATIONS AND METEOHELIX PERSONAL WEATHER STATIONS.